This is another post connected to building quadcopters that adds to the several that already exist on the internet. How is this different? I was interested in making this as generic as possible, so that it can easily be upgraded later if you want to add FPV (first person view), cameras, or carry extra weight (payloads).
So, what parts do we need? Since we are building it from scratch, we need to buy a transmitter and receiver, a battery pack, and a LiPo battery charger as well. Apart from these extras, the standard list of parts includes a quadcopter frame, motors, ESCs (Electronic Speed Controllers), and a flight control board (FCB). We also need some connectors and mounts to set everything up nicely. I’ve discussed the main parts in some detail below.
First of all, keeping weight down always needs to be a priority. The less the weight you will carry, the longer flight times will be, the faster the quadcopter will rise, the more stable it will be. Less weight also means less strain on the motors and ESCs, which means longer lifespans.
The Frame
The first thing to do is either design a frame, or buy a top rated one. Frames are measured by their diagonal (motor to motor) lengths, and range from about 200 mm to 650 mm for quadcopters. It may be overwhelming for a beginner to design an aerodynamically stable frame, but thanks to modern control theory and electronics, it is possible to stabilize almost any frame these days, simply by tuning the PID (Proportional Integral Derivative) control parameters (a standard c0ntrol mechanism that has been used in almost all aerial vehicles for decades). A video here demonstrates this.
A medium sized frame (450 mm) weighs between 250 and 400 grams. Some frames are made of carbon fiber, which makes them lighter, but also more expensive. Frames need to be able to withstand shocks and impacts with the ground in case of crash landings. DJI, a company famous for its high quality quadcopters and drones, manufactures a frame called the F450 Flamewheel, which has a diagonal span of 450 mm, and is one of the standard frames most beginners start with. Owing to its high cost, it has resulted in the spawn of several clones, like the Q450, which look identical and are made of similar materials, but cost about half as much. You can also refer to designs online and 3D print or build your own out of cardboard.
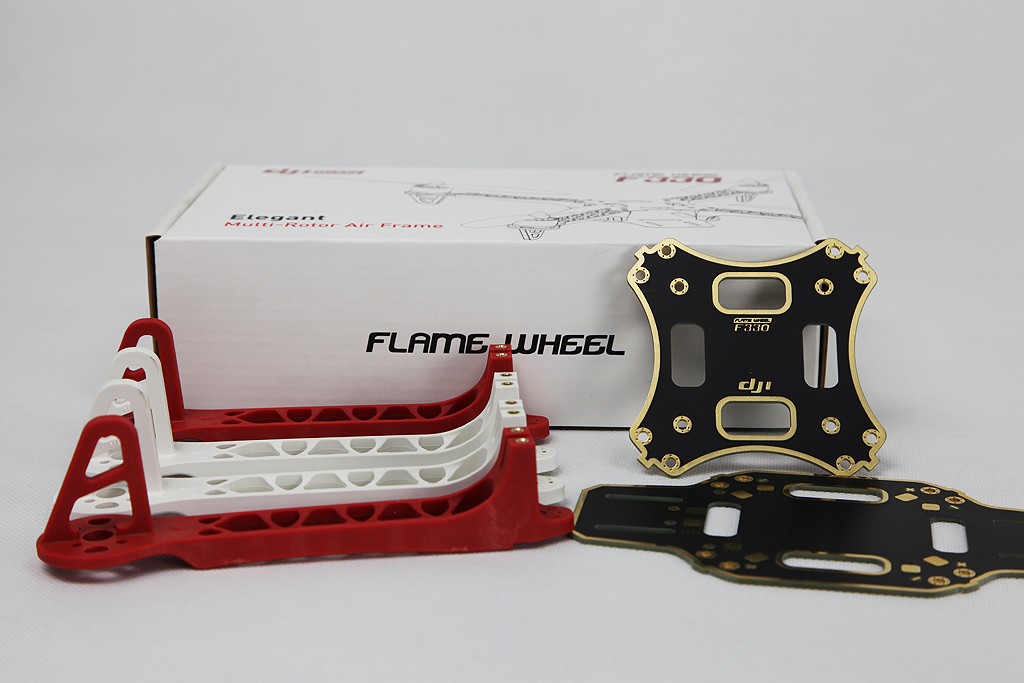
The DJI F450 Flamewheel RTF kit
The Motors (one per arm)
Quadcopters use brushless motors, which are more efficient and provide a better power to weight ratio than brushed motors. They also last longer, since there is no friction between the brushes to wear them out. When choosing motors, you need to consider several specifications. Their kV rating tells you how fast they can spin, that is, how many RPM per volt, at no load. This means that a 1120 kV motor will give 1120 RPM per volt at no load. However, when you attach a propeller to the motor, this will drop considerably. So how does it help? It tells you how powerful the motor is. A low kV motor can spin a larger propeller, and a high kV motor can spin smaller propellers. Large props can generate more thrust, hence lifting more weight. Small props can spin faster, and hence make smaller quadcopters easier to maneuver. For example, I’d use 800-1200kV motors on a quad of size 450-600 mm, but 2000-2400 kV motors on quads of size 250 – 300 mm.
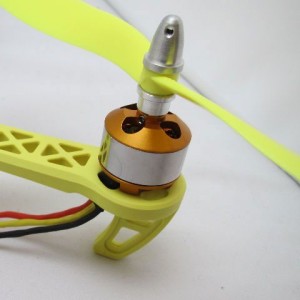
Another parameter to consider is the power the motor consumes to swing the props which you plan to use. The amps the motor pulls will give you an idea of the ESC to be used, and the power consumed by all four motors will give you an estimate of the flight time you can expect from the battery you choose. You need to choose a motor which can give you the required amount of thrust to keep your quadcopter in the air. How do we calculate that?
To keep a 1 kg quad in the air, you need 1 kg of thrust. So, to be able to lift a 1 kg quad in the air, while leaving some room for maneuverability, a tried and tested “rule-of-thumb” is to keep your peak thrust near 2 kg. This means that applying 50% thrust will allow your quad to hover in the air, increasing this will take it higher, and lowering this will bring it down. The widely accepted method is to take the total All Up Weight (AUW) and multiply it by two. Max Thrust Required = 2*AUW.

The DJI 2212 920KV motors
Each motor provides 25% of that thrust. So each motor needs to provide AUW/2 thrust with the propeller you choose. For a quad weighing around 1 kg, each motor should be able to provide at least 500 grams of thrust. While being on the safe side, using motors that provide 700-800 grams of thrust will also allow you to carry a lightweight camera weighing about 500 grams.
The ESCs (one per motor)
The ESCs send the motors three continuously varying phase-shifted AC signals, which the motors need to run. They come with specific amperage ratings, and are pre-programmed with one out of two major firmwares – BLHeli or SimonK. The SimonK firmware is widely claimed to be superior, and allows quicker response times and more stable flights. The amperage rating needs to be 1.2 to 1.5 times the maximum current rating of any of the motors, so that any peak current requirements of the quadcopter (during take-off or quick maneuvers) can easily be taken care of, without overheating or burning of the ESCs.
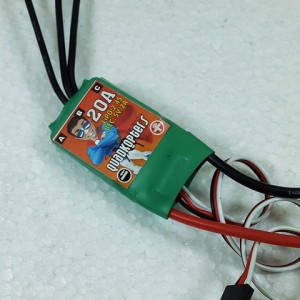
A 20A SimonK ESC from QuadKopters.com
The Flight Control Board (FCB)
The FCB is one of the most important parts of the quadcopter, since it commands the rest of the parts to work together to keep that great monster in the sky! There are several FCBs available, and some hobbyists online who have built their own (see here). Some of the most popular FCBs include the MultiWii (prominently using a Wii Motion Plus controller), the Naze32 board (manufactured by DJI), the PixHawk (manufactured by 3D Robotics), and the KK Board. Out of these, the KK 2.1.5 is the most beginner friendly and easy to use, and costs about ₹2000 in India. However, this also limits the use of GPS, FPV and other interesting uses of quadcopters, so there is a huge trade off while learning to fly.
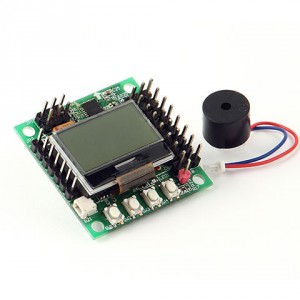
The KK Mini Board
The Battery
The battery is something you need to choose very carefully. Too heavy, and it will not make any difference to your flight time. Too light, and it will not have the capacity to keep your quad in the air for very long anyway. Some specifications to watch out for include the C-rating, the mAh rating, and the S value.
The mAh rating gives you the capacity of the battery, that is, how much energy it contains. A 2200 mAh battery can provide 2.2 A for an hour, or 1.1 A for two hours, depending on the electronics it is connected to.
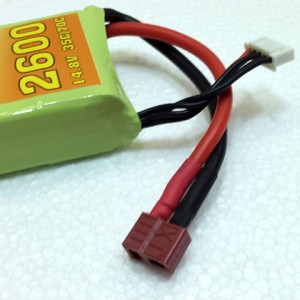
A 2600 mAh 35C/70C 4 cell (14.8 V) battery
The C rating allows you to extract more amps out of the battery (at the cost of time of flight!). So a 2200 mAh battery with a C rating of 50 C will allow you to extract upto 110 A from it, but only for 1.2 minutes. The burst C rating is another parameter, similar to the C rating, but valid only for 10 seconds or so. It is for the peak current requirements, as mentioned in the ESC section. The energy stored in the battery (value in ampere-hours) remains fixed, but this energy can be extracted from it at variable rates, as dictated by the C-rating and the electronics which demand this power.
The S value tells you how many cells in series make up the battery. Each cell usually of 3.7V. So a 3S battery is 11.1V. Higher voltage batteries allow you to expend more power, at lower current ratings, and hence they are used on larger quadcopters or hexacopters. Single celled batteries (3.7V) are used in toy quadcopters, and are much lighter than the other ones. You cannot use standard AA/AAA batteries to power quadcopters, since quads require extremely huge amounts of current continuously, which these batteries cannot provide. Either LiPo or NiMh batteries are used, out of which LiPo batteries are considerably more popular and hence easily available.
The Battery Charger
These LiPo batteries are quite dangerous to handle. They can swell up and explode into flames if their voltage either exceeds or goes below a certain level. They need to be charged with special chargers, so that all the cells are intelligently balanced during the charging, and none get overcharged. These intelligent chargers are usually more expensive than the basic chargers, but it is worth it, for the safety and improvement in battery life.
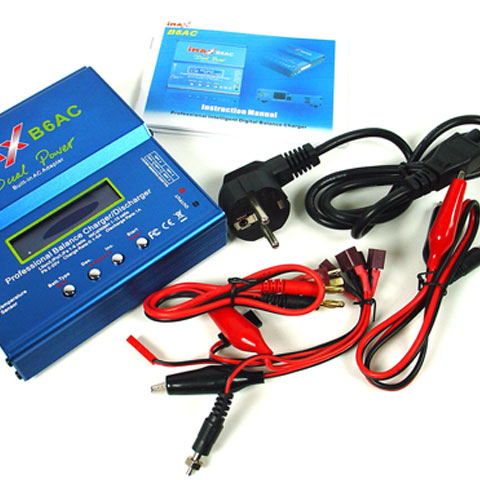
The IMAX B6AC is a professional balance charger.
Transmitter/Receiver
The transmitter remote relays commands from your ground station to the quadcopter in the air, via a 2.4GHz frequency band specially reserved for this application. The quadcopter receives it via another component called the receiver, which is plugged into the flight controller board.
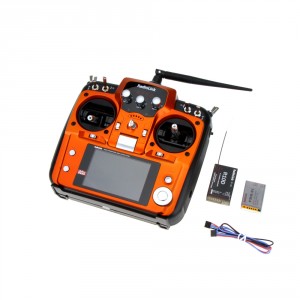
A 2.4GHz 6 channel Tx/Rx pair
There are several types of transmitters available, and they have between 4 and 10 channels (generally). You need a minimum of 4 channels to control the 4 degrees of freedom of a quadcopter (roll, pitch, yaw and thrust). Any extra channels can be used to control lights, camera gimbals, and other mounted electronics. If you decide to move to other related radio controlled aviation, like aeroplanes, you can use the same transmitter-receiver set after the initial setup.
Any questions or thoughts about this article? Feel free to leave a comment below this post, we will endeavor to clear all your doubts as quickly as possible. Thanks for reading, have fun building and flying your first quadcopter!